Sunday, February 14, 2021

NVIDIA Jetson Family Overview

NVIDIA Jetson Family Overview

For Computer Vision and AI development.

What is NVIDIA Jetson ?

NVIDIA Jetson is new product line form NVIDIA Corp.

NVIDIA Jetson is low-cost AI Computer. ( Edge Computing )


NVIDIA Jetson Nano Spec.

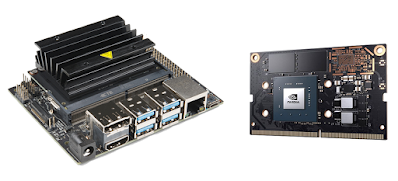
NVIDIA Jetson has 2 platforms  Jetson Development Kits and Jetson Module

NVIDIA Jetson Family


The newest member of the Jetson family! ( Apr 2020 )


Jetson AI Certification

https://developer.nvidia.com/embedded/learn/jetson-ai-certification-programs


Jetson Community Projects

https://developer.nvidia.com/embedded/community/jetson-projects


Adun Nantakaew อดุลย์ นันทะแก้ว 081-6452400
LINE : adunnan

                   https://microcontrollerkits.blogspot.com/

Friday, January 22, 2021

NVIDIA Jetson Performance Monitor with OLED Display

NVIDIA Jetson Performance Monitor on OLED Display

Last article is OLED Display on Jetson Nano . Now we use that for Jetson Nano performance monitor.

Test on 

  • NVIDIA Jetson Nano Developer Kit ( 4 GB )
  • Jetpack SDK 4.4.1 ( L4T 32.4.4 )

OLED Display 

128x32 or 128x64 SSD1306 OLED Display

Wiring Diagram


We've make expansion board for wiring.


Source Code on Github

Install Jetson-stats https://github.com/rbonghi/jetson_stats

Then Install PiOLED https://github.com/amphancm/installPiOLED

Run Code

~/installPiOLED/pioled$ python3 stats.py 

Press Switch Button is change page.
Page 1 Display

Page 2 Display

Page 3 Display

Page 4 Display

Reference

https://github.com/JetsonHacksNano/installPiOLED

https://github.com/rbonghi/jetson_stats


Adun Nantakaew อดุลย์ นันทะแก้ว 081-6452400
LINE : adunnan


Monday, January 18, 2021

OLED Display on NVIDIA Jetson Nano


OLED Display on NVIDIA Jetson Nano

On JetBot (JetBot is an open-source robot based on NVIDIA Jetson Nano.) It has 128x64 OLED and Connector. it's good idea for show something. 


We can use 128x64 OLED Display. ( more popular in the market and low cost )


Wiring Diagram ( same Raspberry pi connector )

I2C connection pin

http://raspberrypi4u.blogspot.com/2017/01/raspberry-pi-oled-i2c.html

OLED Driver and samples from Adafruit

Install the Adafruit PiOLED 128x32 Monochrome OLED driver (3527)

Adafruit-SSD1306 library

https://github.com/JetsonHacksNano/installPiOLED


Reference

https://github.com/JetsonHacksNano/installPiOLED

https://custom-build-robots.com/top-story-en/jetson-nano-oled-display-ssd1306/12124

https://learn.adafruit.com/adafruit-gfx-graphics-library/using-fonts

https://www.freefontspro.com/


Adun Nantakaew อดุลย์ นันทะแก้ว 081-6452400
LINE : adunnan

Tuesday, January 12, 2021

NVIDIA Jetson Nano Bitcoin Mining

What is Bitcoin Mining?

With Bitcoin, miners use special software to solve math problems and are issued a certain number of bitcoins in exchange. This provides a smart way to issue the currency and also creates an incentive for more people to mine.


Why is Monero Coin ( XMR ) ?

Unlike many cryptocurrencies that are derivatives of Bitcoin, Monero is based on the CryptoNote protocol and possesses significant algorithmic differences relating to blockchain obfuscation.
By providing a high level of privacy, Monero is fungible, meaning that every unit of the currency can be substituted by another unit. These units are indistinguishable from one another. This makes Monero different from public-ledger cryptocurrencies like Bitcoin, where addresses previously associated with undesired activity can be blacklisted and refused by network members.

Can the NVIDIA Jetson Nano be used for Bitcoin mining?

It can, just not efficiently.

Then for education purpose.


How many it can?   only 16.xx H/s


if you have 1600 H/s you will get 0.00002 BTC/week.
But NVIDIA Jetson Nano can get only 16 H/s.

Power Consumption of NVIDIA Jetson Nano

use jtop command line


Mining Software

xmrMiner - A CUDA based miner for Monero ( https://github.com/xmrMiner/xmrMiner )

xmrMiner 0.3.0 is ready for the Monero hardfork v7


Reference

http://raspberrypi4u.blogspot.com/2017/11/raspberry-pi-bitcoin-miner-monero-xmr.html

https://www.quora.com/Can-the-NVIDIA-Jetson-TX1-be-used-for-Bitcoin-mining

https://minergate.com/

https://github.com/xmrMiner/xmrMiner


Adun Nantakaew อดุลย์ นันทะแก้ว 081-6452400
LINE : adunnan

Friday, January 12, 2018

ESP32 connect OLED display ( SSD1306 )

ESP32 connect OLED Display

We have ESP32 WiFi Module and We'd like to connect to some small display.Easy way to interface with small display is OLED on I2C Bus. because of use 4 wire to connect.
We choose to OLED is  0.96 inch 128x 64 OLED  and SSD1306 Library from Adafruit.
and we test on Nano32 development board from Gravitech and Maker Asia.


Wiring Diagram


OLED SSD1306 Pin SCL  to  ESP32 GPIO 22
OLED SSD1306 Pin SDA  to  ESP32 GPIO 21

IDE and  Library

We use Arduino IDE to develop code in C/C++.
If you are new for this see How to develop ESP32 on Arduino IDE first.
We use Arduino IDE 1.8.5
Add SSD1306 Library
Goto Menu Sketch => Include Library => Manage Libraries


Then search "ssd1306" and Install Adafriut SSD1306 by Adafriut Version 1.x.x


Edit Some Library code for OLED 128x64 only.
When install library done.
In folder Documents / Arduino / libraries /
We will found Adafriut_SSD1308.ccp and Adafriut_SSD1306.h


Edit Adafruit_SSD1306.ccp line 206
Wire.begin();   to  Wire.begin( 21, 22 );


Edit Adafruit_SSD1306.h line 55
0x3D    to   0x3C


and line 73
uncomment this line for use  #define SSD1306_128_64


Example Code

Goto Menu  File => Examples => Adafruit SSD1306 => ssd1306_128x64_i2c
and edit code line 61 in Setup Function.
change address i2c from 0x3D  to  0x3C.


Then upload code to your ESP32 development board.


Test with ESP32 Thing form Sparkfun


Reference

http://esp32.net/


My Website

email : info@softpowergroup.net  ,amphancm@gmail.com  Tel .+6681-6452400

Android and Arduino IoT


LINE : adunfong
FaceBook : https://www.facebook.com/adun.nantakaew
email: amphancm@gmail.com


Sunday, March 5, 2017

ESP8266 Weather Station with Color TFTLCD


ESP8266 Weather Station with TFTLCD

In this project, we'll learn how to make a weather station using an ESP8266 WiFi Module and a 2.2" TFT LCD display. ( 240 x 320 65K)
This project pulls weather data using the Wunderground API. It displays the date, time, current weather conditionals, 4-day forecast and even moon phases.

Hardware

  1. ESP8266 WiFi Module ( ESP8266 DevKit or NodeMCU )
  2. TFT LCD 2.2 Inch  : TFT01-2.2SP from Electrofreak (SPI Bus )


Wiring Diagram

TFT LCD Pin VCC
TFT LCD Pin GND
TFT LCD Pin CS  to GPIO_5
TFT LCD Pin RST to RST
TFT LCD Pin DC to GPIO_2
TFT LCD Pin MOSI to GPIO_13
TFT LCD Pin CLK to GPIO_14
TFT LCD Pin LED to +3.3 V.
TFT LCD Pin MISO ( not use )

You can test TFTLCD first.see detail.
http://microcontrollerkits.blogspot.com/2015/11/esp8266-wifi-tftlcd.html


Source code

Original Code form squix78
https://github.com/squix78/esp8266-weather-station


Arduino Library
Weather Station Library
Adafruit ILI9341 Library
Adafruit GFX Library
WifiManager Library

Reference
https://learn.adafruit.com/wifi-weather-station-with-tft-display/overview
https://www.wunderground.com/weather/api


My Blog


My Website
email : info@softpowergroup.net   amphancm@gmail.com Tel . +6681-6452400

Facebook https://www.facebook.com/softpowergroup/